How to Set Up Multi-User Mode in QuickBooks Desktop?

Setting up multi-user mode in QuickBooks Desktop allows multiple users to access and work on the same company file simultaneously. This feature is essential for businesses with several employees who need to collaborate on financial data. In this guide, we will walk you through the steps to set up multi-user mode effectively.
Prerequisites for Multi-User Mode
Before you begin, ensure you have the following:
- A licensed copy of QuickBooks Desktop is installed on each user’s computer.
- A server or host computer where the company file is stored.
- Proper network configuration to allow access between computers.
- Administrative access to the computers involved.
Steps to Set Up Multi-User Mode
Step 1: Prepare the Host Computer
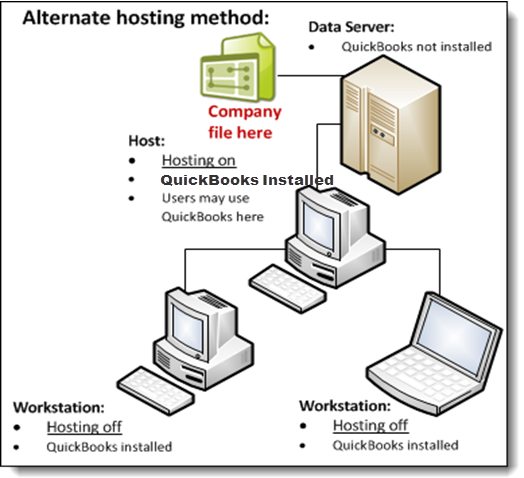
- Install QuickBooks Desktop: Ensure that QuickBooks is installed on the host computer where the company file will be stored. During installation, choose “Custom or Network Options” to set it up for multi-user access.
- Enable Multi-User Hosting:
- Open QuickBooks on the host computer.
- Go to the File menu, hover over Utilities, and select Host Multi-User Access.
- If prompted, confirm that you want to enable multi-user mode.
Step 2: Configure Folder Permissions
- Set Folder Permissions:
- Navigate to the folder where your QuickBooks company file is stored.
- Right-click the folder, select Properties, and go to the Sharing tab.
- Click on Advanced Sharing, check Share this folder, and set permissions to allow users to read and write.
- Adjust Security Settings:
- Still, in the folder properties, go to the Security tab.
- Ensure that all users who will access the file have Full Control permissions.
Step 3: Install QuickBooks on Other Computers
- Install QuickBooks: On each additional computer, install QuickBooks Desktop. Again, choose the “Custom or Network Options” during installation.
- Select Network Installation: When prompted, select the option indicating that you will be using QuickBooks Desktop on this computer but will not store the company file here.
Step 4: Map Network Drive (If Necessary)
If your computers are on a network, you may need to map a network drive to ensure all users can access the company file easily.
- Open Windows Explorer: On the host computer, open Windows Explorer.
- Map Network Drive:
- Click on This PC and select Map Network Drive.
- Choose an unused drive letter and browse to the folder where the company file is stored.
- Click Finish to complete the mapping.
Step 5: Access the Company File
- Open QuickBooks: On each user’s computer, open QuickBooks Desktop.
- Open the Company File:
- Select Open or Restore Company from the File menu.
- Choose Open a company file, navigate to the mapped network drive, and select the company file.
Troubleshooting Common Issues
- Error Messages: If users encounter errors such as H101, H202, H303, or H505, ensure that the QuickBooks Database Server Manager is running on the host computer and that all permissions are correctly set.
- Check Firewall Settings: Ensure that your firewall settings allow QuickBooks to communicate over the network. You may need to create exceptions for QuickBooks in your firewall settings.
Conclusion!
Setting up multi-user mode in QuickBooks Desktop enhances collaboration and productivity within your business. By following the steps outlined above, you can ensure that your team can access and work on financial data simultaneously, streamlining your accounting processes. If you encounter any issues, refer to QuickBooks support for further assistance.
